Unity version control with git.
Using version control is a the best way to guarantee that your code is safe and have access to older versions of the code.
In this post I will show you how to setup unity to work with git.
Requirements:
You need Unity 4 or higher for this to work. (I didn’t test it with a version lower than 4) and a git client.
Setting up Unity:
What we need to do with is to tell Unity to use text based visible meta files.
- Create a new project.
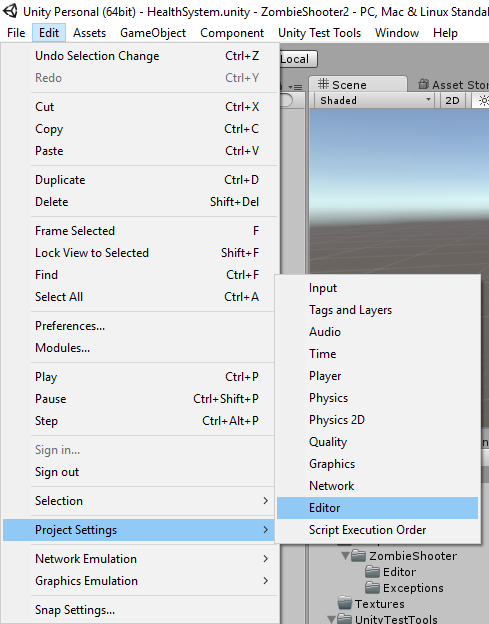
- Go to Edit -> Project Settings -> Editor

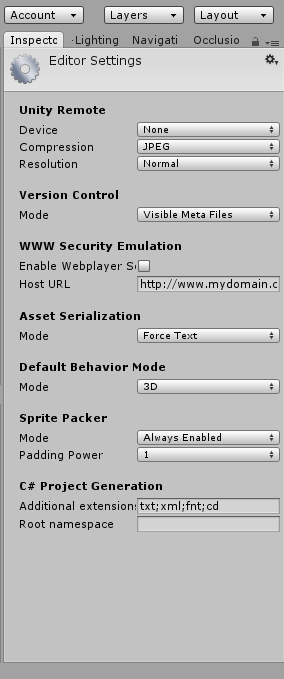
- Change Version Control Mode to from Hidden Meta Files to Visible Meta Files and the Asset Serialization Mode From Mixed to Force Text.

Setting up git:
Now that Unity is configured we need to tell git to ignore some files that Unity generates automatically. This will make sure that the size of the git repository is minimum and prevent some of the conflicts.
To do this we need to add a .gitignore file at the root of our project (not inside the assets folder).
- Use your favorite git client to create a git repository in your project directory.
- Go to your project directory (which should contain .git folder now) and create a new file. Name it .gitignore.
The .gitignore file content:
# =============== #
# Unity generated #
# =============== #
[Tt]emp/
[Oo]bj/
[Bb]uild
[Ll]ibrary/
sysinfo.txt
# ===================================== #
# Visual Studio / MonoDevelop generated #
# ===================================== #
[Ee]xported[Oo]bj/
/*.userprefs
/*.csproj
/*.pidb
/*.suo
/*.sln*
/*.user
/*.unityproj
/*.booproj
# ============ #
# OS generated #
# ============ #
.DS_Store*
._*
.Spotlight-V100
.Trashes
Icon?
ehthumbs.db
[Tt]humbs.db
GitHub repository:
I have created GitHub repository containing an empty Unity Template.
https://github.com/ihachani/Unity-version-control-with-git
Closing
That is it. Now you’re set to use Unity with git.